Petite Gardeners

My petites love to garden and here in the Pacific Northwest we get a little rainy and gardening for our family often doesn’t extend into the winter months.  Until now, I was poking around on Pinterest the other night and saw this, first of all could this little petite be any cuter?  No, I don’t think so.  Check out Katie’s blog here, this is the tutorial for the garden box.  I am in love and digging through my felt to see what I already have to make this adorable play garden.  I haven’t tried the tutorial yet, but just looking at all the details provided I am thinking I am in good hands.  What a fantastic idea to tide petite gardeners through the winter months.

Garden Box Made by Katie at www.skunkboyblog.com

Garden Box Made by Katie at http://www.skunkboyblog.com

Since I am so fond of pairing toys with books I thought about some of our favorite books about gardening and one author comes to mind – Lois Ehlert.  We absolutely love her books, the bright colors and abstractness of the images are fabulous.  I was so excited when I realized that there is a boxed set of her gardening books – Lois Ehlert’s Growing Garden.  The set includes Planting a Rainbow, Eating the Alphabet and Growing Vegetables Soup.  These books are really fantastic for little ones who are learning words and colors as well as for older kiddos who are learning about planting, harvesting and cooking.  These books coupled with the lovely garden box would be an amazing gift for an little one who loves to garden.

Lois Ehlert Boxed Set

Pinterest Garden Obsession

I don’t know about you, but I look at Pinterest all the time.  It used to be a time suck, but now I do a lot of pinning while I am nursing the baby, so I count it as multitasking.  I love looking at all of the neat ways people out in the world maximize space in their gardens.  My latest obsessions are these amazing gutter gardens.  There are so many neat tutorials out there on how to make these awesome gardens.  Here is one that I loved from this super cute blog Borealis, my only problem is we don’t own, so we can’t drill into the fence.  I have been brainstorming ideas in my head for a few weeks now and came up with what I think to be a pretty solid idea.  To complete the gutter garden I need exceptionally large washers, and some sort of chain link, gutters (obviously) and end caps.  I really am hoping my idea works without, a. breaking the fence; b. falling from the fence; c. looking so bad I have to take it down; and d. all of the above.

This sent me and the petites to Home Depot.

Step One: Find Parts Needed.  I found the 10 foot long gutter right away – check.  Then the end caps were right underneath it – check.  Pushing a cart with a 9 month old strapped to the front of you and a four-year old trying to hold a 10-foot long vinyl gutter – not possible.

Step Two: Cut Gutter. So I asked the wood people if they would cut the gutter for me, “no can do Mam”.  Then I am directed to a self cut station.  With one petite in the cart the other strapped to me, I think yep, I’ve totally got this.  Yeah nope.  Luckily for me a nice man happened to walk by and saw me trying to saw a vinyl gutter with a nine-month-old strapped to the front of me.  He took pity on me and cut it for me.  The younger me, would have been mortified that I couldn’t do it all, that as a woman I would need help from a man.  However, now, I must admit I am very fond of my petites fingers that I said heck yeah, cut this gutter please and thank you.

Step Three: Find parts to hook it to fence.  Now for a way to get it to hook into the fence without doing any damage.  Here was the sort of laughable part, everyone is so friendly and really wants to help you find what you’re looking for.  Lucky for me, when I described how I wanted to craftily put the gutter garden to the fence the employees were able to direct me to all the parts I needed.

Step Four: Pay for ALL the items.  I decided to check out at self check and pay for all the items or so I thought.  Until a slightly terse lady notified me that in fact I had not paid for all of the items; that one of the petites had been sitting on some of them and I did indeed need to pay for them.  Fabulous.  I left being slightly embarrassed, but with all of the parts needed to make my awesome gutter garden.  (Another location that may or may not have a picture of me and the petites in some backroom – see my post on our art museum trip)

picstitchSo here is what everything looked like.  As you can see it’s craftily put together and for us that is just fine, it is holding dirt and water successfully and as you can see the fence is still standing.  Yay!  There are much better tutorials out there about making real gutter gardens.  For example here and here.

With that said, if you rent too and want some craftily put together gutter gardens here are the steps:

  1. buy one vinyl gutter, 6 gutter end caps, 14 feet chain (I chose 16lbs. chain), 4 very large washers, 1.5 inches in diameter, some wire(I used old wire from IKEA picture frames), zip ties.
  2. cut gutters into three sections
  3. put end caps onto gutters – they just push on
  4. drill holes all through gutter for drainage
  5. drill holes into gutter walls to hook chain
  6. use zip ties to hold chain and gutter together
  7. measure out how far you want gutters to hang apart, if they are slightly crooked it isn’t a big deal, it’s better for drainage
  8. hook wire to top of chain apex and then attach washer twist it together to hold tight
  9. repeat steps for single gutter that is left (more than two gutters would be too heavy with water and soil and plants)

I will post more pictures once the plants start growing.  The petite has been telling everyone she wants to grow salad, so that is what we will grow in the gutters.

Happy gardening,

E

Meal Planning and Organization

meal planning organization

I have read all about people who plan their meals a month in advance.  When I started out working in the real world, there was a teacher that went shopping once a month and had a monthly calendar printed out that she listed all three meals a day, I was in awe – she was amazing, she had healthy fresh lunches every day and saved a ton of money.  This is something that as I got older, and now have a family of 3.5 (I give the smallest petite a .5 because she’s only 8 months old, so she doesn’t eat a whole lot) I think about a lot.  On Pinterest there are many websites that have been pinned about how these amazing moms create healthy meal plans for their family.

-Why-

What I have noted is that when I plan a weeks’ worth of dinners, I save a ton of money over a months’ time, what I mean by a ton is about $400, I could use an extra $400 each month.  I know this sounds crazy right, but seriously, look at what you spend in any given week and then create and stick to a meal plan, it will be a lot less I am sure.  I think that this works because you aren’t stopping off at the store on the way home, when you’re hungry and tired and just want something quick, which odds are isn’t terribly healthy or affordable.  Because you have a plan you don’t have to come home and do the look in the fridge for inspiration and see none then call for takeout.  Another bonus is if you plan out two weeks in advance you can buy in bulk and save a little here and there.  I will say that I always had to stop weekly for produce, no matter how well I planned, we’d either eat it or it wouldn’t last longer than a week.

-Pitfalls-

Where I seem to usually struggle, is that I will get a plan and then on the day I am supposed to eat, grilled chicken salad, I want a giant cheese burger.  Or even better, when I was working if I had had a long day and didn’t want to cook and wanted some amazing Thai take out.  The worst was when I would stop off for something premade, like at Whole Foods, $50 later and I have half a green salad and a cookie.  These are the areas that are always my personal pitfalls.

-How to Make it Work-

I am trying to figure out a menu situation that will be practical and pretty all at the same time.  I need something that will help me to keep up with this, I don’t want meal planning to be a tedious endeavor or I won’t stick with it.  I know if I plan well that we can save money and eat healthier.  Sounds like a late New Year’s resolution to me.   Ugh, another pitfall, in the weekly meal planning process, I tend to forget the meals I make, and then I get stuck with some variation of grilled chicken, tacos, soup, salad, grilled steak, pork chops – repeat, repeat, repeat over and over again until I never want to eat it ever again.  This was my thinking in choosing the boards that have the meal cards, that you can rotate through.

-Let’s Make this Happen-

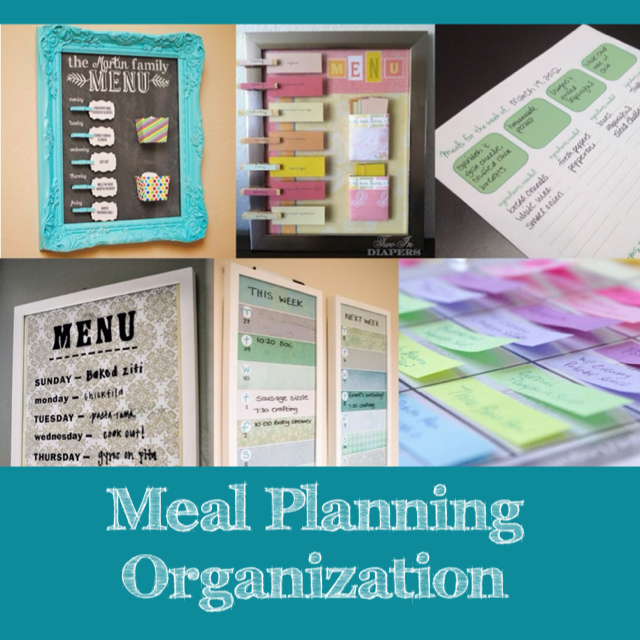
The best way, in my opinion, is to have some sort of organizational system. Here are some of my favorite menu planning ideas for small spaces:

option 2 option 3 option 1 option 5 option 2 Option 1


I love all of these creative ideas, now if I could just choose one and stick to it.

-Erin


You’ve Got Mail

My petite got a little mailbox from her Nana for Valentine’s Day, she loves getting and sending mail.  In fact she has 5 steps you must follow to send a proper letter.Envelopes

  1. Write the letter
  2. Get an envelope
  3. Get a stamp
  4. Address the envelope
  5. Take it to the post office

This is a routine ritual that we’ve been doing for months, so I thought it would be fun to make her some envelopes that she could use with her new mailbox.

To complete this project you don’t need a whole heck of a lot of things.

  • felt (5 pieces)
  • sewing machine
  • scissors
  • ric rac (optional – use a light to burn the edges so they don’t fray over time)
  • Velcro (optional)

It is rather amazing that this whole project took one nap time (with interruptions, probably 1 hour)

I love that this whole project to make four envelopes of all different sizes took 5 pieces of felt (that’s about $1.25), the rick rack was from another project, but it’s such a small amount less than half a yard I am sure.  I used Velcro on the back to hold it together, but you could sew the envelopes so that they don’t pop back open.

Steps:

  1. Cut the size you want and fold into three parts
  2. Cut the ric rac and burn the edges so they dont fray
  3. Sew the ric rac on or use the zigzag stitch to sew the address
  4. Then sew on the stamp (I totally messed up sewing the heart on one of them…oh well – I’m guessing the petite is not going to mind)
  5. Sew up the sides, I did a back and forth on the ends so that it won’t come apart when she opens it
  6. Put the Velcro on (I did this after I sewed them because I forgot about it, might be easier to do before you sew the sides)

I love the finished copy they are so cute.  I also cut out hearts to go in each one of them from the left over pieces.

Happy ‘almost’ Valentine’s Day.

Erin

Valentine’s Gumdrops

gumdropsLet me just start by saying I LOVE Pinterest.  I was looking up fun things to make for Valentine’s treats with the petite and she saw these and we had to make them.  The recipie is from Mom on Time Out – my daughter loved them and they are incredibly easy to make.  The hardest part was the waiting till it was time to get them out.

 You only need a few ingredients, I will say the next time we make them I might try cutting down the sugar and seeing how they end up.

If you’re looking for other delicious Valentine’s treats check out Mom on Time Out – she has amazing recipies.

Enjoy,

Erin